Custom models
Custom meshes in GLights are set up using Model Templates, which are just pretty long settings scripts that explain how your lens, light source, beam and everything else should look and behave. This page explains how to create a model template script and what all the settings are.
Creating custom model scripts requires some scripting knowledge.
This page is quite long because it explains everything in details. In the end it all comes down to creating a 40 line long script with a bunch of settings.
1. Create a script
Firstly, create a new ModuleScript inside of the Custom > LightTemplates folder. Name the script something meaningful, this name will be used later.
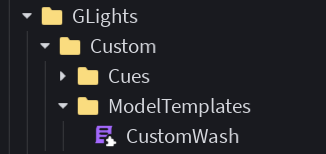
If you inserted GLights into your game from the toolbox recently, you might need to edit the capabilities of this script. Models inserted from the toolbox are sandboxed by default, and the script you created is not sandboxed, which will make Roblox angry about the mismatch.
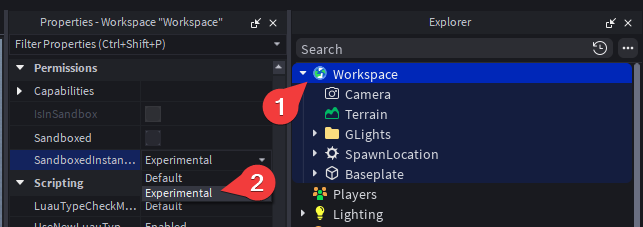
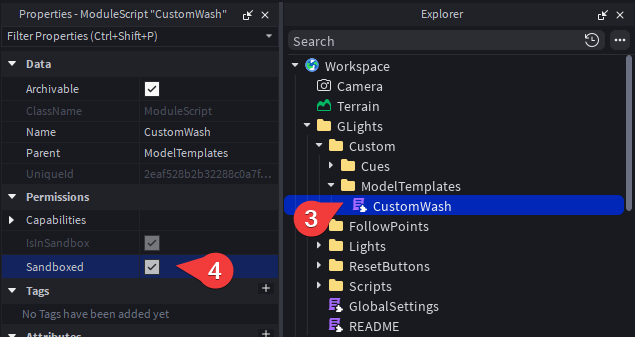
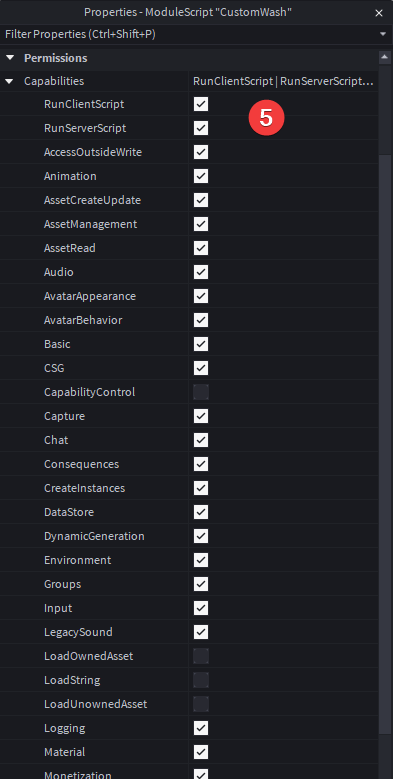
To enable sandboxing on your script, follow these steps:
- Select
Workspace - Change the
SandboxedInstanceModeproperty toExperimental - Select your script
- Enable the
Sandboxedproperty - Under the
Capabilitiesproperty, enable all capabilities except forCapabilityControl,LoadOwnedAsset,LoadStringandLoadUnownedAsset - If you wish, change the
SandboxedInstanceModeproperty back toDefault
If you just want to make small changes to a light instead of making an entirely new custom model, see the Bonus: override default models section. You might still need to come back here to understand all of the things you can change.
For now paste this into the script:
return {
	CanHaveBeam = true;
	BeamDirection = Vector3.new(1, 0, 0);
	BeamLength = 100;
	BeamWidth0 = 1;
	BeamWidth1 = 80;
	BeamTexture = "rbxassetid://901813002";
	TextureLength = 0.99;
	BeamTextureMode = Enum.TextureMode.Stretch;
	DefaultBeamMode = "Beam";
	BaseAttachmentOrientation = Vector3.new(0, 0, 0);
	EndAttachmentOrientation = Vector3.new(0, 0, 0);

	CanHaveMotors = true;
	HasTiltMotor = true;
	HasPanMotor = true;
	HasGoboMotor = true;

	CanFollow = true;
	FollowTextureLength = 0.5;
	FollowBeamWidth = 0.125;

	IsMultilens = false;
	GetLens = function(model)
		return model.Head.Lens
	end;

	CanHaveLight = true;
	LightTemplate = {
		Type = "SpotLight",
		Angle = 20,
		Face = "Right",
		Range = 60,
		Brightness = 1,
	};

	CanHaveGobo = true;
	GoboSpread = 20;
	GoboBeamWidth0 = 0.5;
	GoboBeamWidth1 = 30;
	GoboBeamTexture = "rbxassetid://901813002";
	GoboBeamTextureMode = Enum.TextureMode.Stretch;
	GoboAttachmentOrientation = Vector3.new(0, 0, 0);

	AddMotors = function(model, motor, weld, unanchor)

	end;
}
This is a template for a light model. It contains basic information about what a light can and can't do. You'll need to edit those properties to fit your light model. Let's go through each of the sections one by one.
1. Beam configuration
The first section contains information about the beam of the light:
CanHaveBeam = true;
BeamDirection = Vector3.new(1, 0, 0);
BeamLength = 100;
BeamWidth0 = 1;
BeamWidth1 = 80;
BeamTexture = "rbxassetid://901813002";
TextureLength = 0.99;
BeamTextureMode = Enum.TextureMode.Stretch;
DefaultBeamMode = "Beam";
BaseAttachmentOrientation = Vector3.new(0, 0, 0);
EndAttachmentOrientation = Vector3.new(0, 0, 0);
CanHaveBeam tells GLights whether or not this light model can have a beam. If your custom model shouldn't have beams, then set this setting to false. If it's false, you can ignore or remove all the other settings in this category.
BeamDirection is the direction in which the beam is facing relative to the lens. Generally you can just experiment with setting one of the numbers to either 1 or -1 until it's correct.
BeamLength is the default length of the beam, it can be overriden in Settings later.
BeamWidth0 and BeamWidth1 are the Width0 (at the start) and Width1 (at the end) properties of the beam.
BeamTexture is the ID of a texture of the beam.
TextureLength describes how much much of the texture will be used on the beam. When using the default texture, setting this number to a smaller value will make the beam brighter.
BeamTextureMode is the texture mode used by the beam.
DefaultBeamMode is the default beam visibility mode on the panel, this can be either "NoBeam", "Beam" or "Gobo".
BaseAttachmentOrientation and EndAttachmentOrientation can be used by you if you need to rotate the attachments that the beam is attached to. Most of the time you can keep them set to their default values.
2. Motor configuration
The next section includes information on which motors should be generated:
CanHaveMotors = true;
HasTiltMotor = true;
HasPanMotor = true;
HasGoboMotor = true;
CanHaveMotors tells GLights whether or not this light model has motors in general. You should set this to false if the lights shouldn't have motors.
HasTiltMotor, HasPanMotor and HasGoboMotor changes whether or not those motors get generated. The gobo motor is used for gobo rotate.
3. Follow spotlight configuration
The next section contains information about follow spotlight functionality:
CanFollow = true;
FollowTextureLength = 0.5;
FollowBeamWidth = 0.125;
CanFollow decides whether or not the lights can follow players or points at all.
FollowTextureLength is the length of the beam texture when following. By default, the beam is dimmer at the end, so it wouldn't be visible when following someone. The smaller this number is, the more visible the beam will be. You should keep this number at 0.99 or lower.
FollowBeamWidth decides how much the width of the beam will change when following someone. The beam changes its length so it would look wrong if it stayed the same width. This number should be higher than 0 and smaller or equal to 1.
You'll have to experiment with the FollowTextureLength and FollowBeamWidth properties until they look right.
4. Lens configuration
The next section contains the function that's responsible for getting the lens part or a list of lens parts in your custom model. A lens is a part (or a mesh, union or anything similar) that will hold the light source, the beam and will change its colour when turning on/off:
IsMultilens = false;
GetLens = function(model)
	return model.Head.Lens
end;
IsMultilens decides whether the model has one lens or multiple lenses. Set this to true if you have a model with multiple lenses / beams / etc.
GetLens is a function responsible for getting the lens inside of the model. If your custom model has the same structure as the official lights, you don't need to worry about this. If you have a light with multiple lenses, you should change GetLens to GetLenses and return a table of all lenses.
Model with one lens:
IsMultilens = false;
GetLens = function(model)
	return model.Head.Lens
end;
Model with multiple lenses (this assumes the lenses are all in a Lens folder inside Head):
IsMultilens = true;
GetLenses = function(model)
	return model.Head.Lens:GetChildren()
end;
5. Light configuration
The next section contains information about the light source:
CanHaveLight = true;
LightTemplate = {
	Type = "SpotLight",
	Angle = 20,
	Face = "Right",
	Range = 60,
	Brightness = 1,
};
CanHaveLight controls whether or not your model can have a light source.
LightTemplate contains the light source configuration:
Typeis the type of the light,"SpotLight","SurfaceLight"or"PointLight"Angleis the angle of the lightFaceis the direction the light is facing,"Top","Bottom","Left","Right","Front"or"Back"Rangeis the range of the light, 60 at mostBrightnessis how bright the light gets when it's turned on
LightTemplates can also have an optional Offset property which tells GLights to offset the light in a certain direction, for example:
LightTemplate = {
	Type = "SpotLight",
	Angle = 20,
	Face = "Right",
	Range = 60,
	Brightness = 1,
	Offset = Vector3.new(20, 0, 0),
};
6. Gobo configuration
The next section contains information about gobo beams:
CanHaveGobo = true;
GoboSpread = 20;
GoboBeamWidth0 = 0.5;
GoboBeamWidth1 = 30;
GoboBeamTexture = "rbxassetid://901813002";
GoboBeamTextureMode = Enum.TextureMode.Stretch;
GoboAttachmentOrientation = Vector3.new(0, 0, 0);
CanHaveGobo decides whether or not your custom model can have gobo beams.
GoboSpread decides how far away from the middle (in studs) the gobo beams will reach.
GoboBeamWidth0 and GoboBeamWidth1 decide how wide gobo beams are at the beginning and end.
GoboBeamTexture is the ID of a texture used for gobo beams.
GoboBeamTextureMode is the texture mode used by the gobo beams.
GoboAttachmentOrientation allows you to rotate the gobo end attachments.
The current version of GLights has a bug with gobo beams. For them to be placed correctly, the BeamDirection setting must be either Vector3.new(1, 0, 0) or Vector3.new(-1, 0, 0). Other values will cause the gobo beams to look flat. This will be fixed in the next version of GLights.
7. AddMotors function
The last section contains a function that's responsible for creating motors, welding the light together and unanchoring relevant parts
The code you copied earlier has an empty function for you to fill out:
AddMotors = function(model, motor, weld, unanchor)

end;
You can use motor(name, part1, part2, cframe1, cframe2) to create a motor between two parts.
nameshould be either"Tilt","Pan"or"Gobo".part1andpart2should be the parts that should be connected by a motor, for example if you want to connect partsFix1 > Base > BaseandFix1 > Arm > Arm,part1should bemodel.Base.Baseandpart2should bemodel.Arm.Arm.cframe1andcframe2should be theC0andC1properties of a RobloxMotor6D.- You can look below at an example of how they could look.
- The numbers inside
CFrame.new()are positions and the numbers insideCFrame.Angles()are rotations. - You can just guess the rotation numbers until the motor aligns correctly, most of the time the three numbers there should be an increment of 90 degrees (-90, 0, 90, 180 and so on).
- You can also insert anything there and mess around with the numbers in-game for a live preview, the motors are in the
Motorsfolder inside each fixture.
You can use weld(part1, part2) to weld two parts together (connect them so they move together). For example, you could write weld(model.Arm.Arm, model.Arm.Decorations).
You can use unanchor to unanchor a part, so its actually affected by the motors and welds. See below for examples.
Here is an example of how the function could look:
AddMotors = function(model, motor, weld, unanchor)
	motor(
		"Tilt",
		model.Arm.Arm,
		model.Head.Head,
		CFrame.new(0, 0.6, 0) * CFrame.Angles(math.rad(0), math.rad(-90), math.rad(180)),
		CFrame.new(0, 0, 0) * CFrame.Angles(math.rad(0), math.rad(-90), math.rad(-180))
	)
	motor(
		"Pan",
		model.Base.Base,
		model.Arm.Arm,
		CFrame.new(0, 1.3, 0) * CFrame.Angles(math.rad(90), math.rad(0), math.rad(0)),
		CFrame.new(0, 0, 0) * CFrame.Angles(math.rad(90), math.rad(0), math.rad(0))
	)
	motor(
		"Gobo",
		model.Head.Head,
		model.Head.Lens,
		CFrame.new(0, 1.05, 0) * CFrame.Angles(math.rad(90), math.rad(0), math.rad(-90)),
		CFrame.new(0, 0, 0) * CFrame.Angles(math.rad(0), math.rad(-90), math.rad(180))
	)
	unanchor(model.Head.Head)
	unanchor(model.Head.Lens)
	unanchor(model.Arm.Arm)
end;
2. Use your custom model
After finishing your work with the script, you can use the name of the script in the BaseModel setting of your panels. For example, you might change
BaseModel = "Wash",
to
BaseModel = "CustomWash",
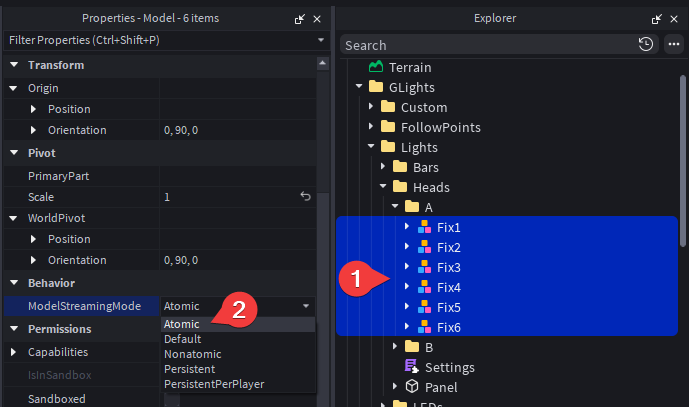
You must set the ModelStreamingMode property of your model (the one named something like Fix1 specifically) to Atomic if you want your models to work with streaming.
Bonus: override default models
If you want to just make small changes to a light, for example change the light angle or how the motors are generated, you can use an Inherit property in your custom model script to copy over all properties from that light model. For example if you wanted to change the light angle of washes to 10, your custom model script can look like this:
return {
	Inherit = "Wash";

	LightTemplate = {
		Type = "SpotLight",
		Angle = 10,
		Face = "Right",
		Range = 60,
		Brightness = 1,
	};
}
Summary
To create a custom GLights model, create a new ModuleScript in Custom > ModelTemplates, copy the code from the first section and edit all of the necessary properties. Alternatively add an Inherit = "different model name"; property to copy over all properties from that model and only add the stuff you want to override. Then you can use the name of your module script in the BaseModel setting